Getting Started
Deploy your first model on Qwak in minutes!
Building your first model
It's time to build your first ML model on Qwak!
A model build is a trained, serialized and tested model instance, bundled with necessary dependencies that can be later deployed to production.
Qwak builds models on a scalable infrastructure that allows you to customize resources, whether using a pre-trained model or running live training of any size.
Creating a model
To get started, we need to create a new model and a new project on Qwak. Projects allow us to group and organize our models under one place.
Creating models and projects can be done either through the user interface or by using the Qwak CLI.
In this tutorial, we will be using the Qwak CLI.
- Create the
Credit Riskmodel under theCredit Risk Modelingproject:
qwak models create "Credit Risk" --project "Credit Risk Modeling"
- Generate a local example model with all the required files:
qwak models init --example credit_risk .
- Remotely build the model on Qwak by pointing the
qwakclient to your local model directory and with the remote model ID. Qwak generates model IDs automatically by converting the model name to lowercase and removing any spaces
qwak models build ./credit_risk --model-id credit_risk
Which will show the following in the terminal:
# ✅ Fetching Model Code (0:00:00.16)
# ✅ Registering Qwak Build - 100% (0:00:07.79)
#
# Build ID d12c188e-c6ad-4f91-9a74-9d18c1b18018 triggered remotely
#
########### To follow build logs using CLI
# qwak models builds logs -b d12c188e-c6ad-4f91-9a74-9d18c1b18018 --follow
#
########### To follow build logs using Qwak platform
# https://app.qwak.ai/projects/b731b293-405a-491e-a17d-8c63c3d03017/credit_risk/build/d12c188e-c6ad-4f91-9a74-9d18c1b18018
Viewing build logs
To monitor the progress of your build on Qwak, view logs via the CLI or UI.
Logs provide real-time updates on the process, including any errors or warnings or debug information.
CLI: Run qwak models builds logs -b <build-id> --follow and replace build-id with your build id.
App: To view build logs via the UI, follow the links provided in the terminal when building a model.
qwak models build ./credit_risk --model-id “credit_risk”

# ✅ Fetching Model Code (0:00:00.16)
# ✅ Registering Qwak Build - 100% (0:00:07.79)

# Build ID d12c188e-c6ad-4f91-9a74-9d18c1b18018 triggered remotely

########### To follow build logs using CLI
# qwak models builds logs -b d12c188e-c6ad-4f91-9a74-9d18c1b18018 --follow

########### To follow build logs using Qwak platform
# https://app.qwak.ai/projects/b731b293-405a-491e-a17d-8c63c3d03017/credit_risk/build/d12c188e-c6ad-4f91-9a74-9d18c1b18018
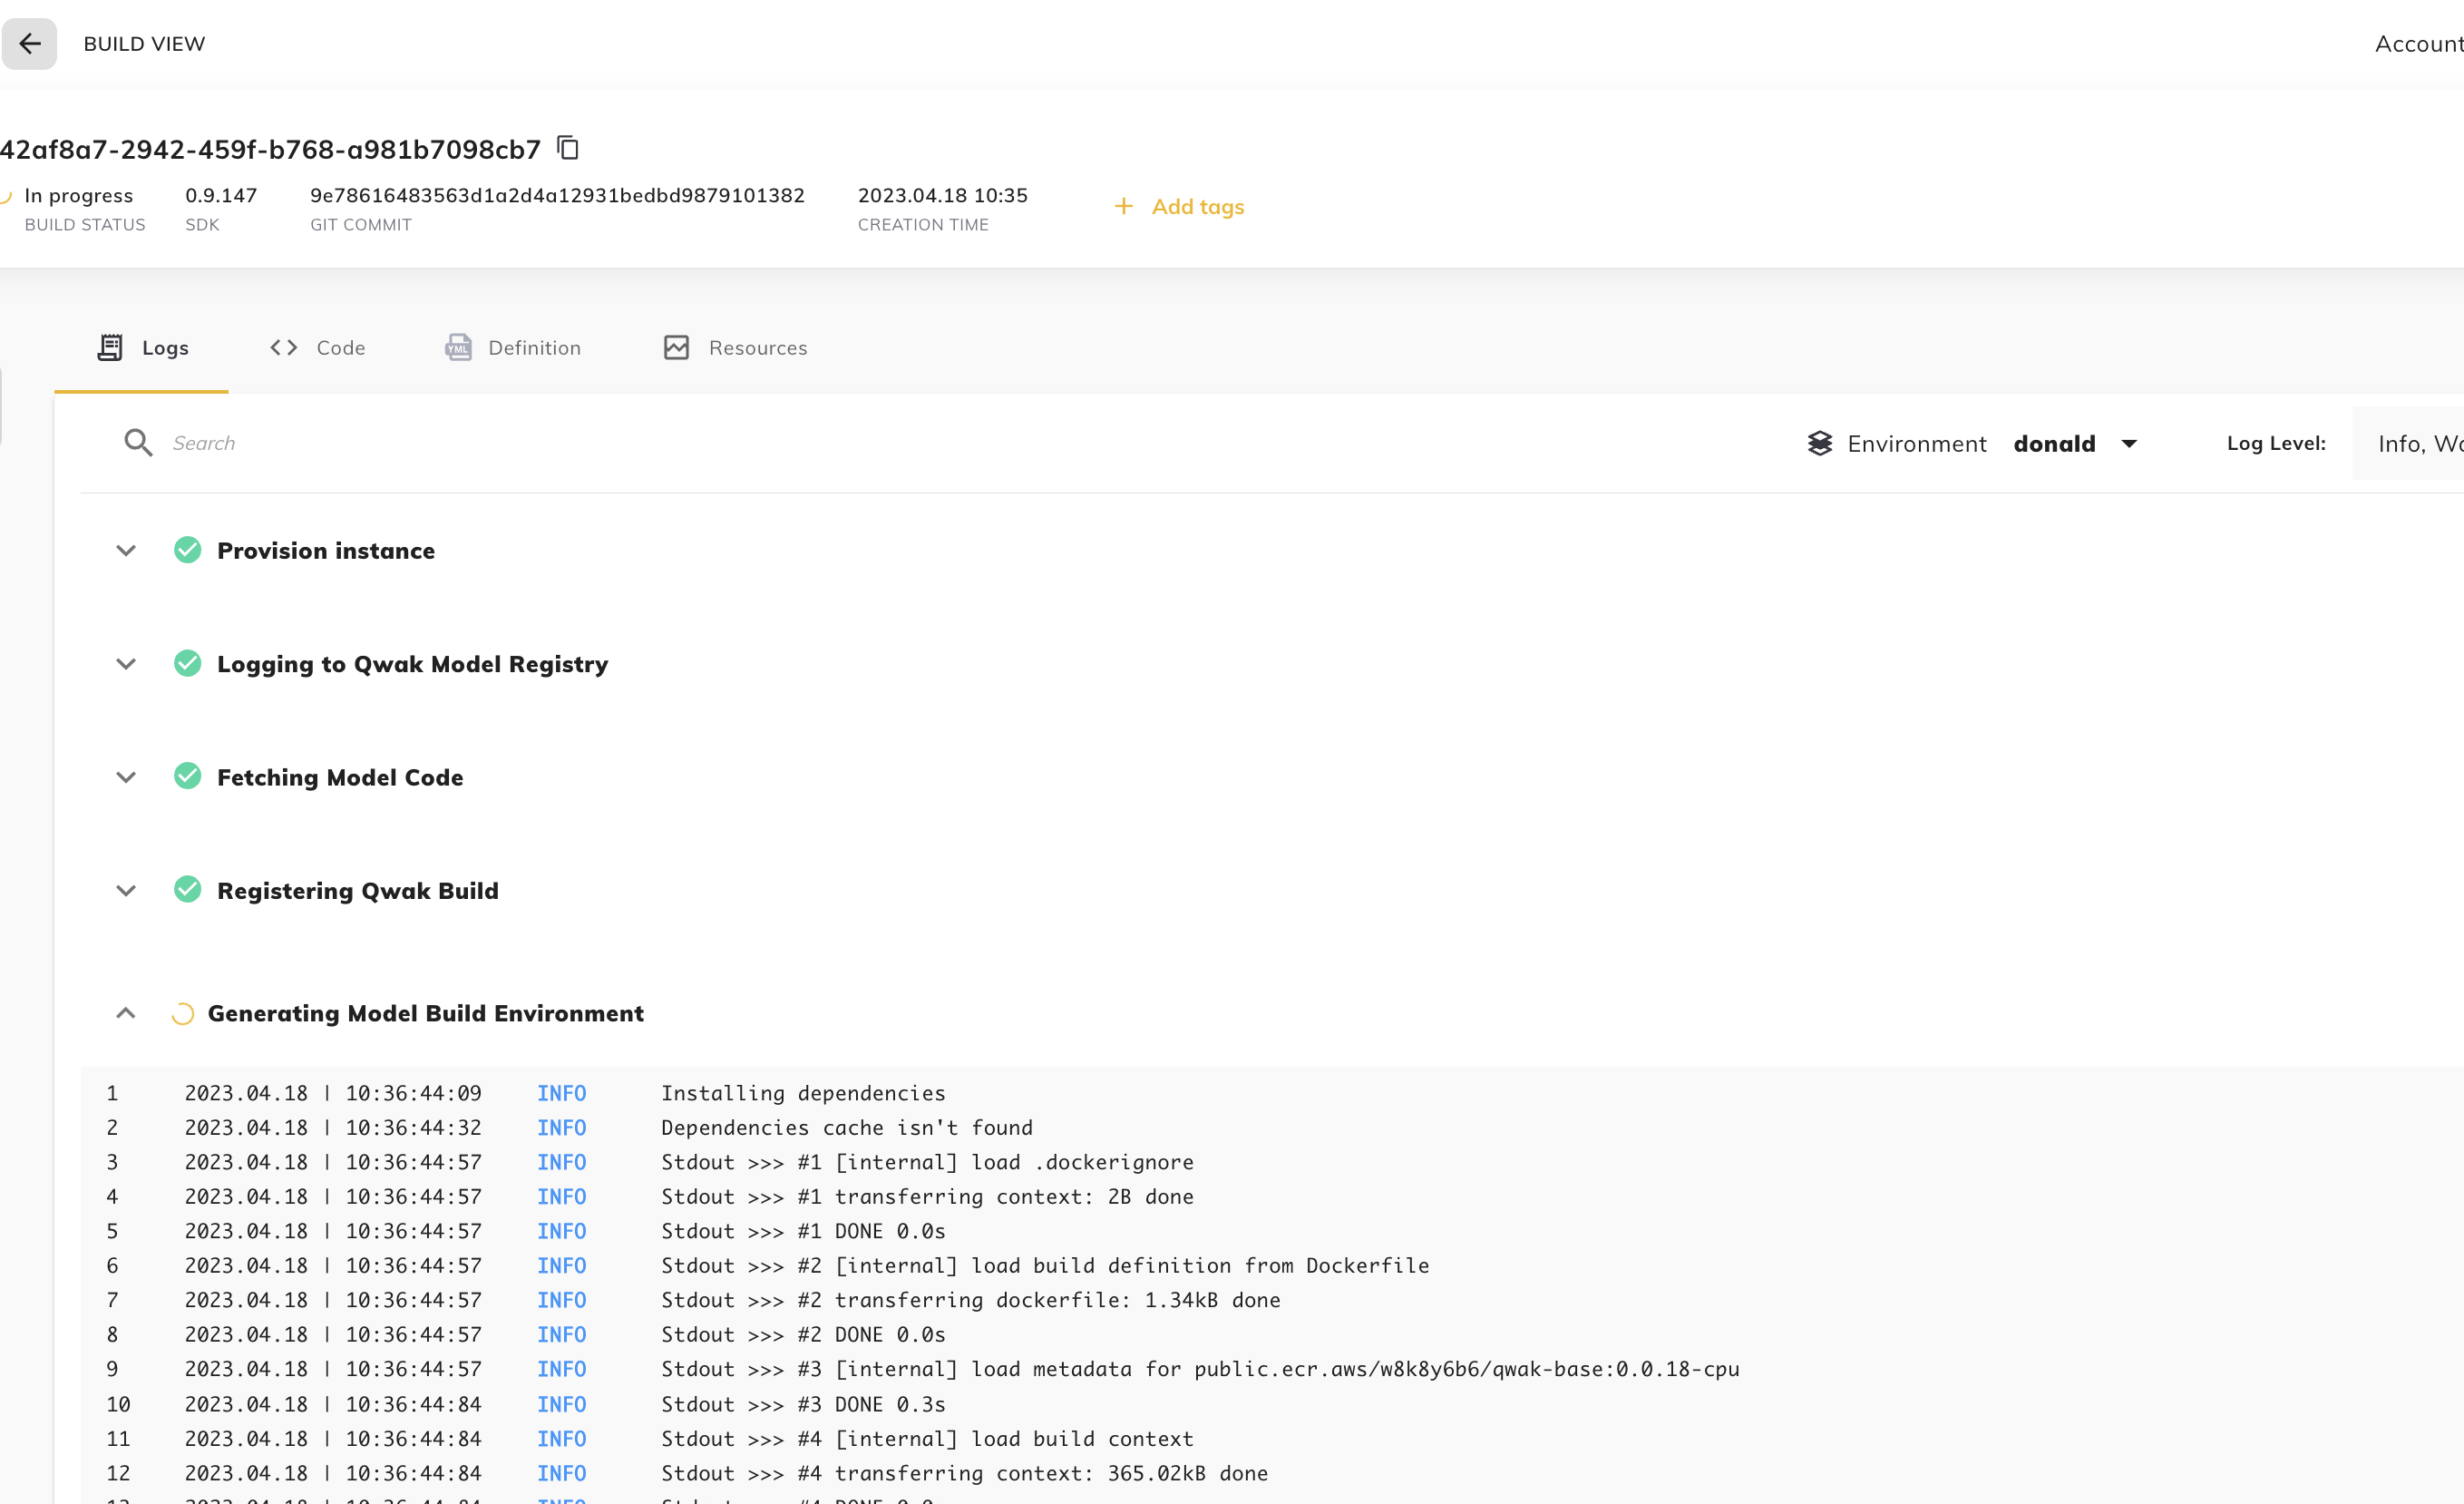
An example for the build logs page on Qwak
Using the
--deployflag will build and automatically deploy your model.qwak models build ./credit_risk --model-id credit_risk --deployWhich will show the following in the terminal:
# ✅ Fetching Model Code (0:00:00.19)
# ✅ Registering Qwak Build - 100% (0:00:06.17)
# ✅ Deploying - Waiting for build to finish (0:03:14.53)
#
# Build ID a08faef3-dbb8-483d-8017-94b35f259c9c finished successfully and deployed
#
########### To view the model using Qwak platform
# https://app.qwak.ai/projects/b731b293-405a-491e-a17d-8c63c3d03017/credit_risk
Deploying your model
After a successful build, our model can be deployed as a real-time inference endpoint on Qwak, ready to handle predictions. Copy the build ID from the previous build step and replace it with YOUR_BUILD_ID
qwak models deploy realtime --model-id credit_risk --build-id {YOUR_BUILD_ID}
After running the deployment command, you can expect to see the following output:
╒═══════════════╤══════════════════════════════════════╕
│ Environment   │ qwak_demo                            │
├───────────────┼──────────────────────────────────────┤
│ Model ID      │ credit_risk                          │
├───────────────┼──────────────────────────────────────┤
│ Build ID      │ f42af8a7-2942-459f-b768-a981b7098cb7 │
├───────────────┼──────────────────────────────────────┤
│ Deployment ID │ e2d9a66f-26be-4201-b1ea-f1ccf312d5d4 │
╘═══════════════╧══════════════════════════════════════╛

Deployment initiated successfully, Use --sync to wait for deployment to be ready.
Testing your model
After a successful model deployment, you can test your live inference endpoint.
The Qwak Python SDK includes a real-time client module which you have to separately install:
pip install qwak-inference
You can use it to run inference and predictions using your deployed real-time model:
from qwak_inference import RealTimeClient

# Update this variable with your account name (lower cased)
ENVIRONMENT = "your-account-name"

QWAK_MODEL_ID = 'credit_risk'

if __name__ == '__main__':
  feature_vector = [
    {
      "UserId" : "male",
      "Age" : 3,
      "Sex" : "male",
      "Job" : 2,
      "Housing" : "male",
      "Saving accounts" : "male",
      "Checking account" : "male",
      "Credit amount" : 54.2,
      "Duration" : 4,
      "Purpose" : "male",
      "Age_cat" : "male",
    }]

  client = RealTimeClient(model_id=QWAK_MODEL_ID,
                          environment=ENVIRONMENT)
  response = client.predict(feature_vector)
  print(response)
Once you begin making predictions using the deployed model, you will be able to view relevant metrics in the Health dashboard on the Model Overview tab.

Querying model predictions
Querying model predictions is an essential step in the machine learning development process. With Qwak, it's easy to query your model's predictions and view relevant metrics.
- Open your model page on the Qwak Application
- Choose the Analytics tab
- Click Run, and you'll see a table containing a row for every prediction made against the model.
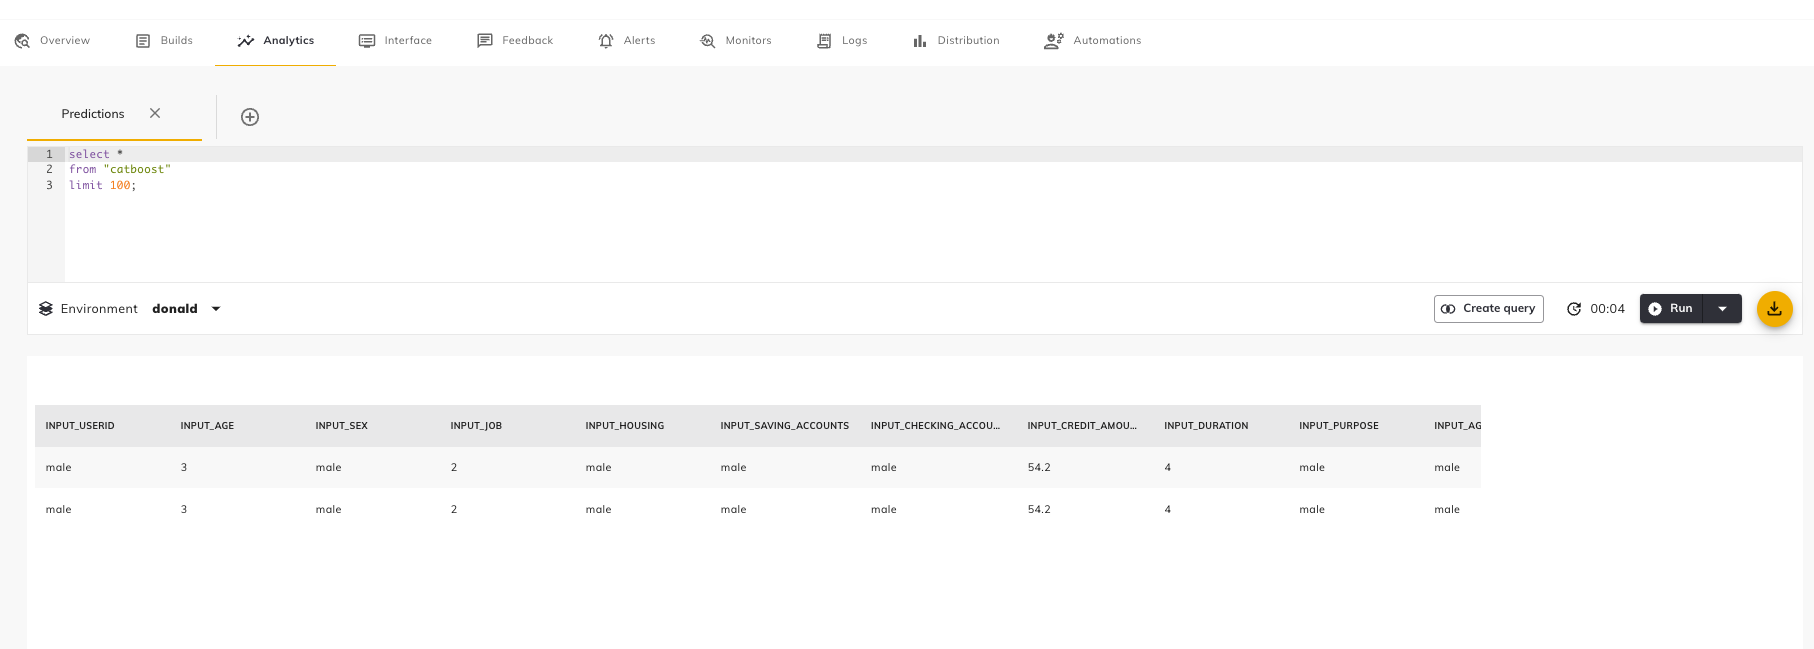
The Analytics tab under the model page
Updated 8 months ago