Build & Deploy Actions
Integrate Qwak into your CI/CD and automate your mode builds and deployments
Introduction
This guide is designed to give you a foundational understanding for setting up a ML Continuous Integration (CI) and Continuous Deployment (CD) pipelines.
By following this guide, you'll learn how to automate the build and deployment of your Qwak Models using GitHub Actions.
Why CI/CD for Machine Learning?
CI/CD serves as a critical tool for automating ML model building and deployment. By automating these tasks, CI/CD ensures that your models are reliable and robust, providing better version control, reproducibility and collaboration.
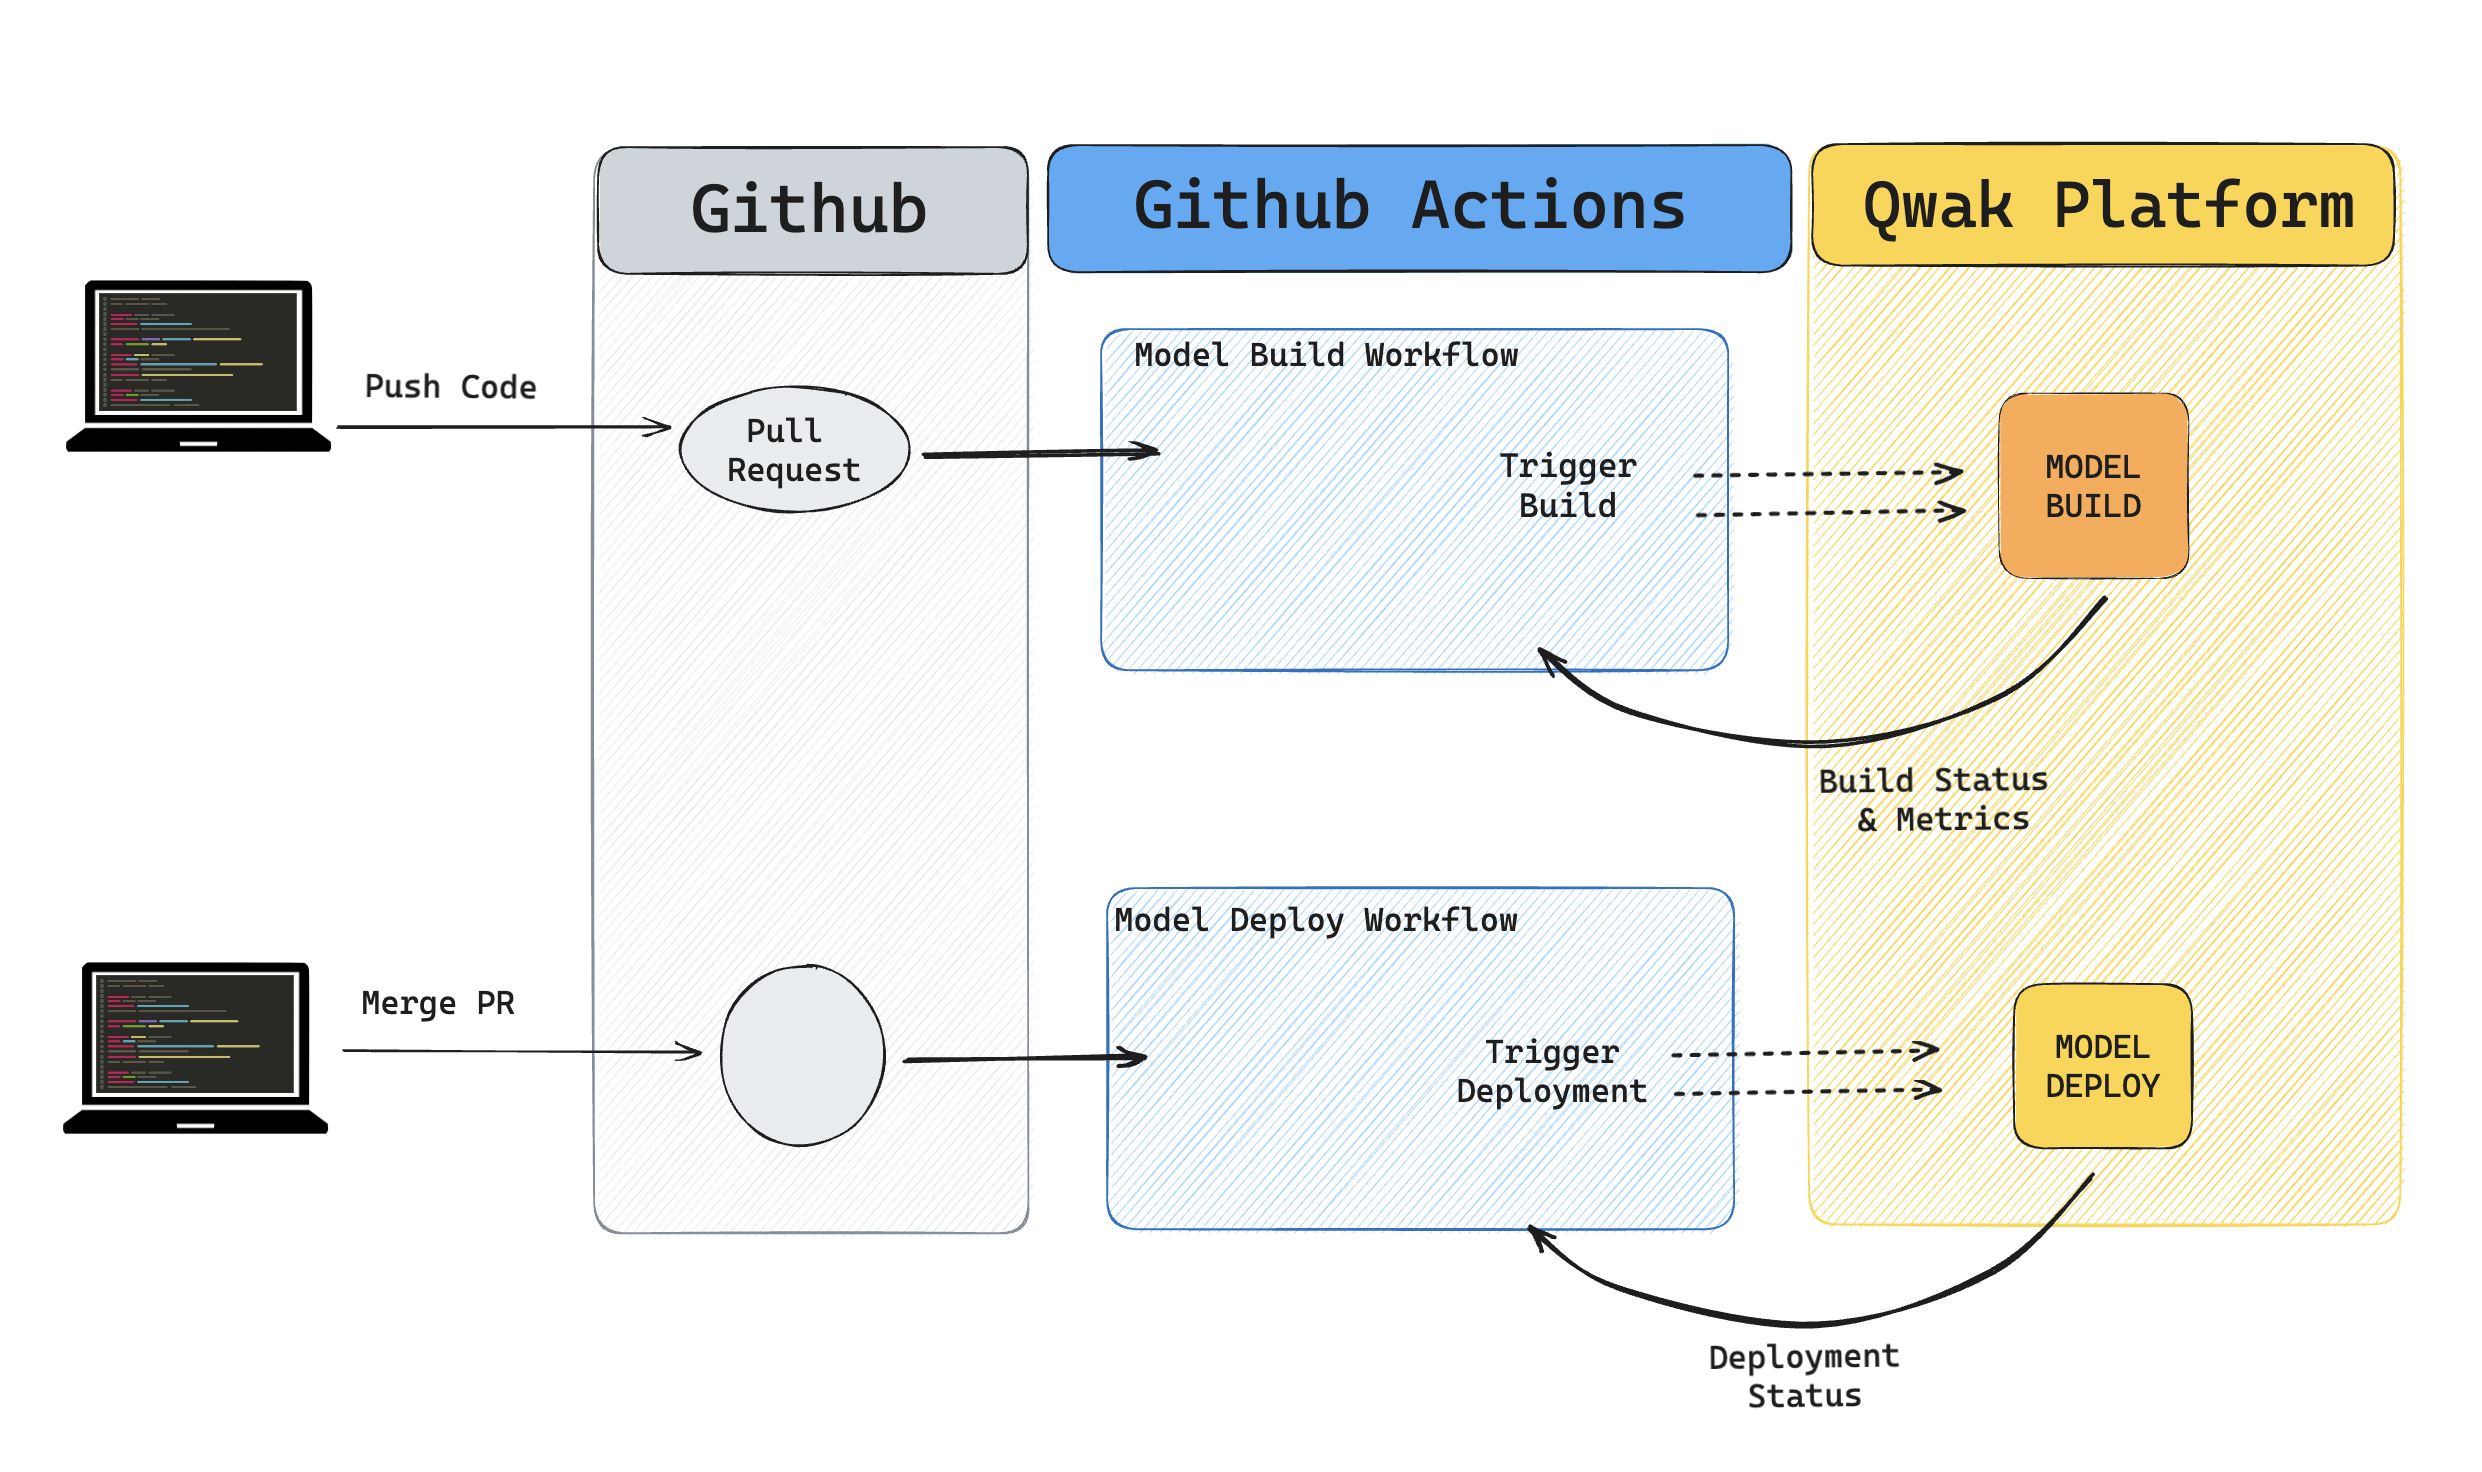
Qwak + Github Actions
While Qwak Automations support scheduled model builds and deployments, to take full advantage of a flexible CI/CD pipeline you can use Github Actions. This would allow you to build an ML pipeline with custom triggers and workflows.
Qwak has created Custom Actions to call the Build and Deploy capabilities within your custom workflows.
Qwak Build Action - A custom GitHub Action that allows you to automate the model training process. It triggers the build process in Qwak, ensuring that your models are trained with the latest data and configurations.
Qwak Deploy Action - A custom GitHub Action designed to automate the model deployment process. It deploys the trained and validated models to your specified environment in Qwak.
Prerequisites
- A GitHub repository containing your Qwak Model code.
- A Qwak Model created under your Qwak account.
Setup
- In your Qwak account go to your
Settings>Service API Keysand clickCreate new service API key.
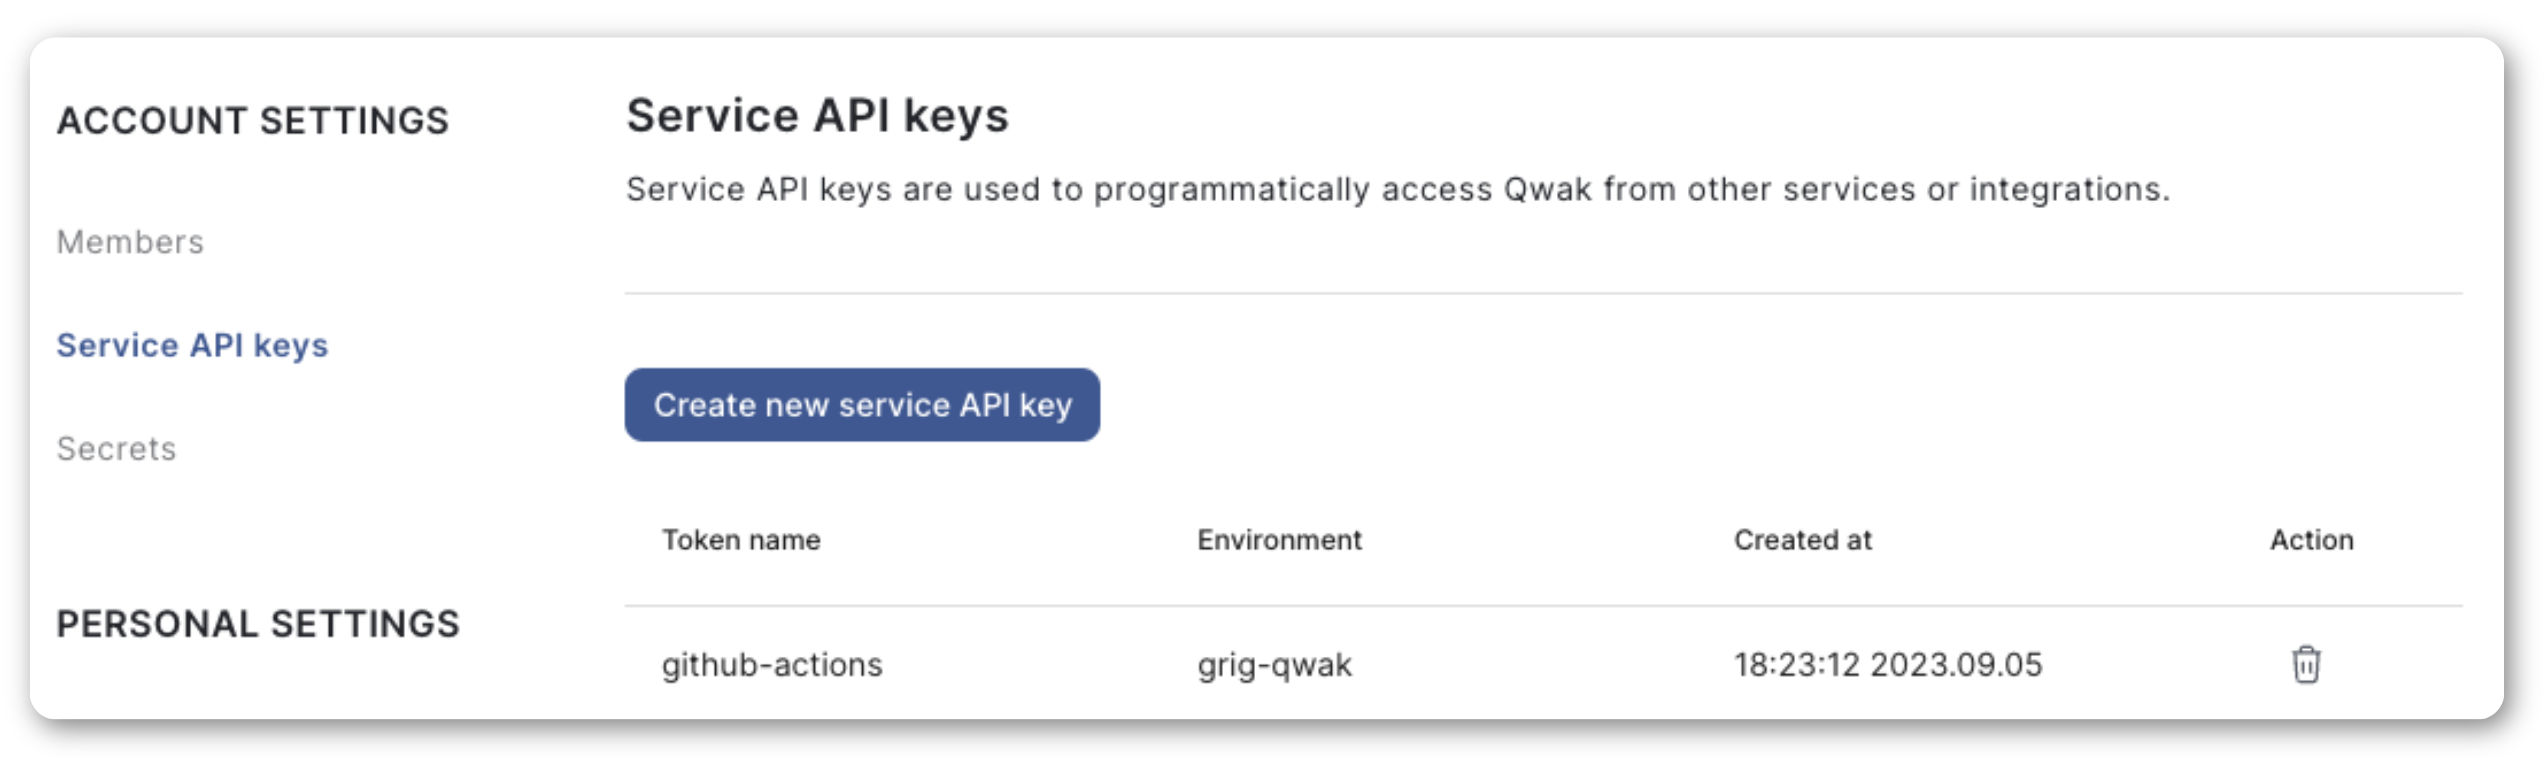
- Fill in a name for the new key, e.g.
github-actionsand copy its value. - Navigate to your GitHub repository
Settings, thenSecrets and variables > Actions. - Create a new repository secret named
QWAK_API_KEYand paste your Qwak Service API key as a value. - Create a new repository variable named
QWAK_MODEL_IDand paste your Qwak model ID from your CLI or Dashboard.
Build Action
In essence, build-action serves as an enhanced version of the qwak models build Qwak CLI command. It not only initiates the build but also waits for its completion and outputs additional details like build status and performance metrics.
For full documentation of the
build-actionplease refer to the its Github Marketplace page.
Calling the build-action
build-actionIn GitHub Actions, custom actions like build-actiond can be executed as a step within a workflow job. Below is a sample YAML example that demonstrates how to use it to build a Qwak Model.
- name: Build Qwak Model
  uses: qwak-ai/build-action@v1
  with:
    qwak-api-key: <YOUR_QWAK_API_KEY>
    model-id: <YOUR_MODEL_ID>
This build action is the equivalent of running the following Qwak CLI command:
qwak models build --model-id <your-model-id>
Building a Qwak Model on Pull-Request
The following Github Actions Workflow example will show you how to use the build-action in practice.
To use this Build Worfklow in your Github repository please:
- Create a new directory in your repository called
.github/workflows/ - n the new directory create a new file named
build-qwak-model-pr.yamlin your and add the following YAML snippet:
name: Build and Deploy Qwak Model on PR

on:
  pull_request:
    types: [opened, reopened, synchronize]
    branches:
        - 'main'                    # replace with your `main` or `master` branch
    paths-ignore:
        - "*.md"                    # Ignore modifications to Readme files
  workflow_dispatch:                # Enables manual trigger

jobs:
  build:
    runs-on: ubuntu-latest         # change with your requirede instance for example [ubuntu-latest]

    steps:
    - name: Checkout code
      uses: actions/checkout@v3

    - name: Build Qwak Model
      uses: qwak-ai/build-action@v1
      with:
        qwak-api-key: ${{ secrets.QWAK_API_KEY }}
        model-id: ${{ vars.QWAK_MODEL_ID }}                 # stored as a Repository variable
        instance: 'medium'                                  # replace with the required instance
        tags: ${{ github.head_ref }}                        # tag the build with the branch name
        # other config inputs as needed

    # [Optional] Additional step to notify e.g. Slack

    # [Optional] Additional step to post a link to the Qwak Build on the Pull Request page
The YAML file build-qwak-model-pr.yaml defines a GitHub Actions workflow that automates the process of building and deploying a Qwak Model whenever a pull request is made. The workflow is specifically configured to trigger on pull requests that are opened, reopened, or synchronized on the main branch. It ignores any changes made to Markdown files (like READMEs).
The workflow consists of a single job named build that has two main steps:
Checkout code: This step uses GitHub's actions/checkout@v3 to clone the repository's code onto the runner.
Build Qwak Model: This step uses a Qwak's build-action to build the Qwak Model. It uses the Qwak API key and model ID stored as GitHub secrets and repository variables, respectively. The model is built on a 'medium' instance and tagged with the name of the branch that triggered the workflow.
Additionally, you can add more steps for notifications, like sending a message to Slack, or for posting a link to the UI Qwak Build on the pull request page.
Overall, this workflow provides a streamlined way to automatically build your Qwak Models in a consistent environment, ensuring that the model is built successfully before any code is merged into the main branch.
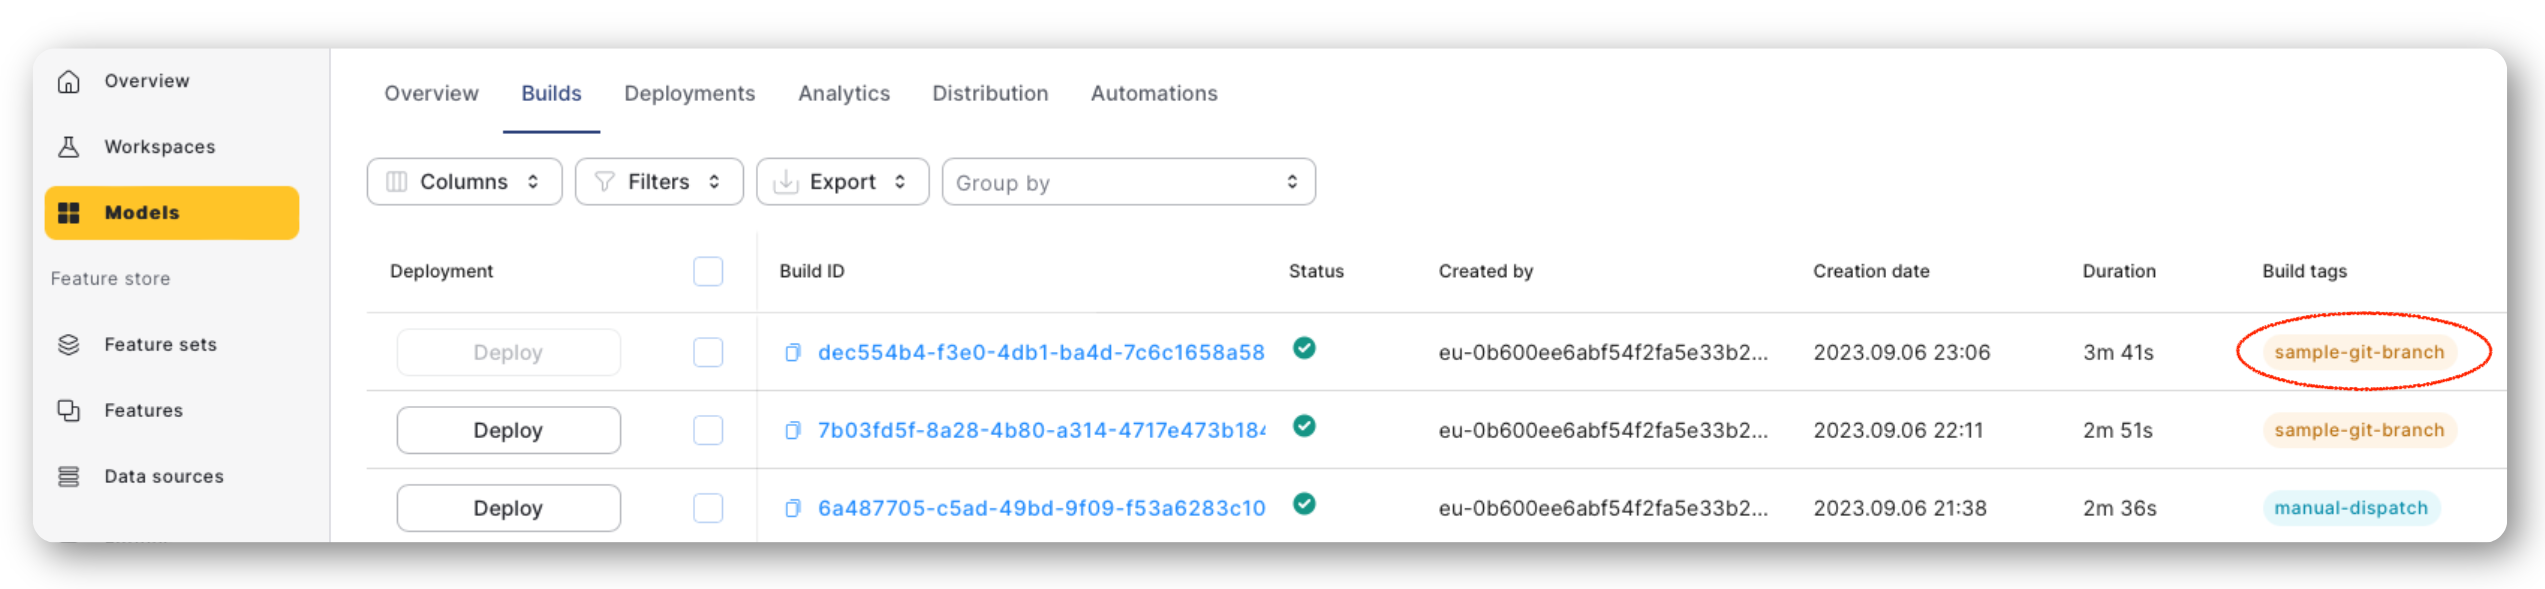
Tagging
Alternatively, you can tag a Build with the
PR Titleusing${{ github.event.pull_request.title }}instead of the Git branch${{ github.head_ref }}.
Deploy Action
The deploy-action works similarly to the build-action as it wraps the qwak models deploy command, but it has several design changes:
- Deployment type related configurations are declared in the
param-listinput field, separated by comma. - The
tagsfield allows you to deploy the latest successful build ID that with the tags mentioned when calling the action. - The action returns the deployment status, deployment and build ID.
For a full reference on the action documentation please refer to the Actions' Github Marketplace page.
Calling the deploy-action
deploy-action- name: Deploy Qwak Model
uses: qwak-ai/deploy-action@v1
with:
qwak-api-key: <YOUR-QWAK-API-KEY>
model-id: <YOUR-MODEL-ID>
deploy-type: realtime
param-list: 'timeout=3000'
This example action is the equivalent for the following Qwak CLI command:
qwak models deploy realtime --model-id <your-model-id> --timeout 3000
Deploy Qwak Model when a PR is Merged
The following Github Actions Workflow example will show you how to use the deploy-action in practice. To use this Worfklow in your Github repository please:
- create a new directory in your repository called
.github/workflows/(if you haven't already) - in the new directory create a new file named
deploy-model-pr-merged.yamlin your and add the following YAML snippet:
name: Deploy Successful Qwak Model Build When Pull-Request is Merged

on:
  pull_request:
    types: [closed]

  workflow_dispatch:                # Enables manual trigger

jobs:
  deploy:
    runs-on: ubuntu-latest
    if: github.event.pull_request.merged == true
    steps:

      - name: Deploy the latest successful Qwak Model Build with the Git branch tag
        uses: qwak-ai/deploy-action@v1
        with:
            qwak-api-key: ${{ secrets.QWAK_API_KEY }}
            deploy-type: 'realtime'               # Replace with the deployment type you need
            model-id: ${{ vars.QWAK_MODEL_ID }}   # Using the repository variable for model ID
            tags: ${{ github.head_ref }}          # Deploy the latest successful build with the Git branch that is being merged
            param-list: 'protected,timeout=6000'  # Deploy a protected variation with a 6000 MS endpoint timeout
            instance: 'small'                     # Optional, specify if you want a different instance type
This Github Workflow is designed to automatically deploy a Qwak Model when a Pull Request is successfully merged.
It consists of a single job called deploy that has a conditional statement that checks if the pull request has been merged. It utilizes qwak-ai/deploy-action@v1 to deploy the latest successful Qwak Model build tagged with the Git branch name. The deployment is configured as realtime and as a Protected Variation.
The primary step in this job is to deploy the latest successful Qwak Model Build using the deploy-action. This action requires several inputs:
qwak-api-key: The API key for Qwak, stored as a GitHub secret.deploy-type: Specifies the type of deployment, set to 'realtime' in this example.model-id: The ID of the Qwak model to be deployed, stored as a repository variable.tags: Uses the name of the branch being merged as a tag to identify which build to deploy.param-list: Additional parameters for the deployment, such as making it 'protected' and setting a timeout of 6000 milliseconds.instance: Optionally, you can specify a different instance type; 'small' is used in this example.
In summary, this workflow automates the deployment of a Qwak Model when a pull request is merged, using the name of the merged branch as a tag to identify the build to be deployed.
Testing your Workflows
- Commit and push the workflow changes to your repository.
- Create a pull request to the
mainbranch to trigger the first workflow. - Check the
Actionstab in your repository to see the workflow run.
Troubleshooting
Github Actions have an inherently slow feedback loop due to the fact that you can only run them (by default) in your Github account, after committing your changes. For that reason it is recommended that you test as much as possible on your local machine.
Validating Qwak Actions
Before executing build-action and deploy-action in your workflow, you can validate their inputs by running the corresponding commands locally. This ensures that the actions will execute as expected when deployed.
For instance, if you're planning to use the following build-action:
- name: Build Qwak Model
  uses: qwak-ai/build-action@v1
  with:
    qwak-api-key: ${{ secrets.QWAK_API_KEY }}
    model-id: ${{ vars.QWAK_MODEL_ID }}
    param-list: 'iterations=1000,loss_function=MAE' # model hyperparameters
    instance: 'gpu.t4.xlx'
    iam-role-arn: 'arn:aws:iam::<account-id>:role/<role-name>'
You can test the qwak models build command that the action would run, on your local machine.
qwak models build --model-id <your-model> -P iterations=1000 -P loss_function='MAE' \
                  --instance 'gpu.t4.xlx' \
                  --iam-role-arn 'arn:aws:iam::<account-id>:role/<role-name>'
And you would quickly observe that the instance type is not valid in this example, as opposed to committing all the changes and the running this workflow in Github Actions to test out the qwak command.
For extensive documentation on calling Qwak Actions please refer to each Action's Github repository or marketplace README.
Conclusion
In this article, we've delved into the key aspects of continuous integration and continuous deployment, specifically focusing on machine learning model building and deployment. By leveraging GitHub Actions and Qwak's custom actions in your CI/CD pipeline, you can significantly streamline your workflows.
This fosters greater collaboration and efficiency within your team, ensuring that your machine learning models are always up-to-date, robust, and reliable.
Updated 8 months ago