Accessing AWS Resources with IAM Role
Learn to grant access to AWS resources in your Qwak account.
Introduction
This article will provide you with a step by step guide on accessing data from your AWS private S3 bucket by assuming an IAM role via the Qwak platform.
IAM roles provide a more secure and flexible way to grant permissions to your AWS resources, as opposed to passing AWS credentials directly. Instead of using static keys, an IAM role allows you to delegate permissions that enable specific actions on specific AWS resources.
Overall, IAM roles offer a robust mechanism for adhering to the principle of least privilege, thereby enhancing the security posture of your AWS environment.
Prerequisites
- An AWS account: You must have an AWS account with sufficient permissions to create IAM roles.
- An S3 Bucket containing your data: Make sure you have an S3 Bucket set up and your data stored within it.
Defining the IAM Role
In this tutorial, the IAM role will be assumed by Qwak's AWS account, eliminating the need to distribute or embed long-term AWS credentials. IAM roles use temporary security tokens, making them a more secure and auditable way to manage access to AWS resources.
Step 1. Access the IAM Dashboard
- In the AWS Management Console, type "IAM" in the search bar or find "IAM" under the "Security, Identity, & Compliance" section.
- Click on "IAM" to open the IAM dashboard.
Step 2. Navigate to Roles
- In the IAM dashboard, locate the left sidebar.
- Click on "Roles" to access the roles management page.
Step 3. Create a new Role
Click the "Create role" button to start defining a new IAM role.
Step 4. Add the Trust Policy
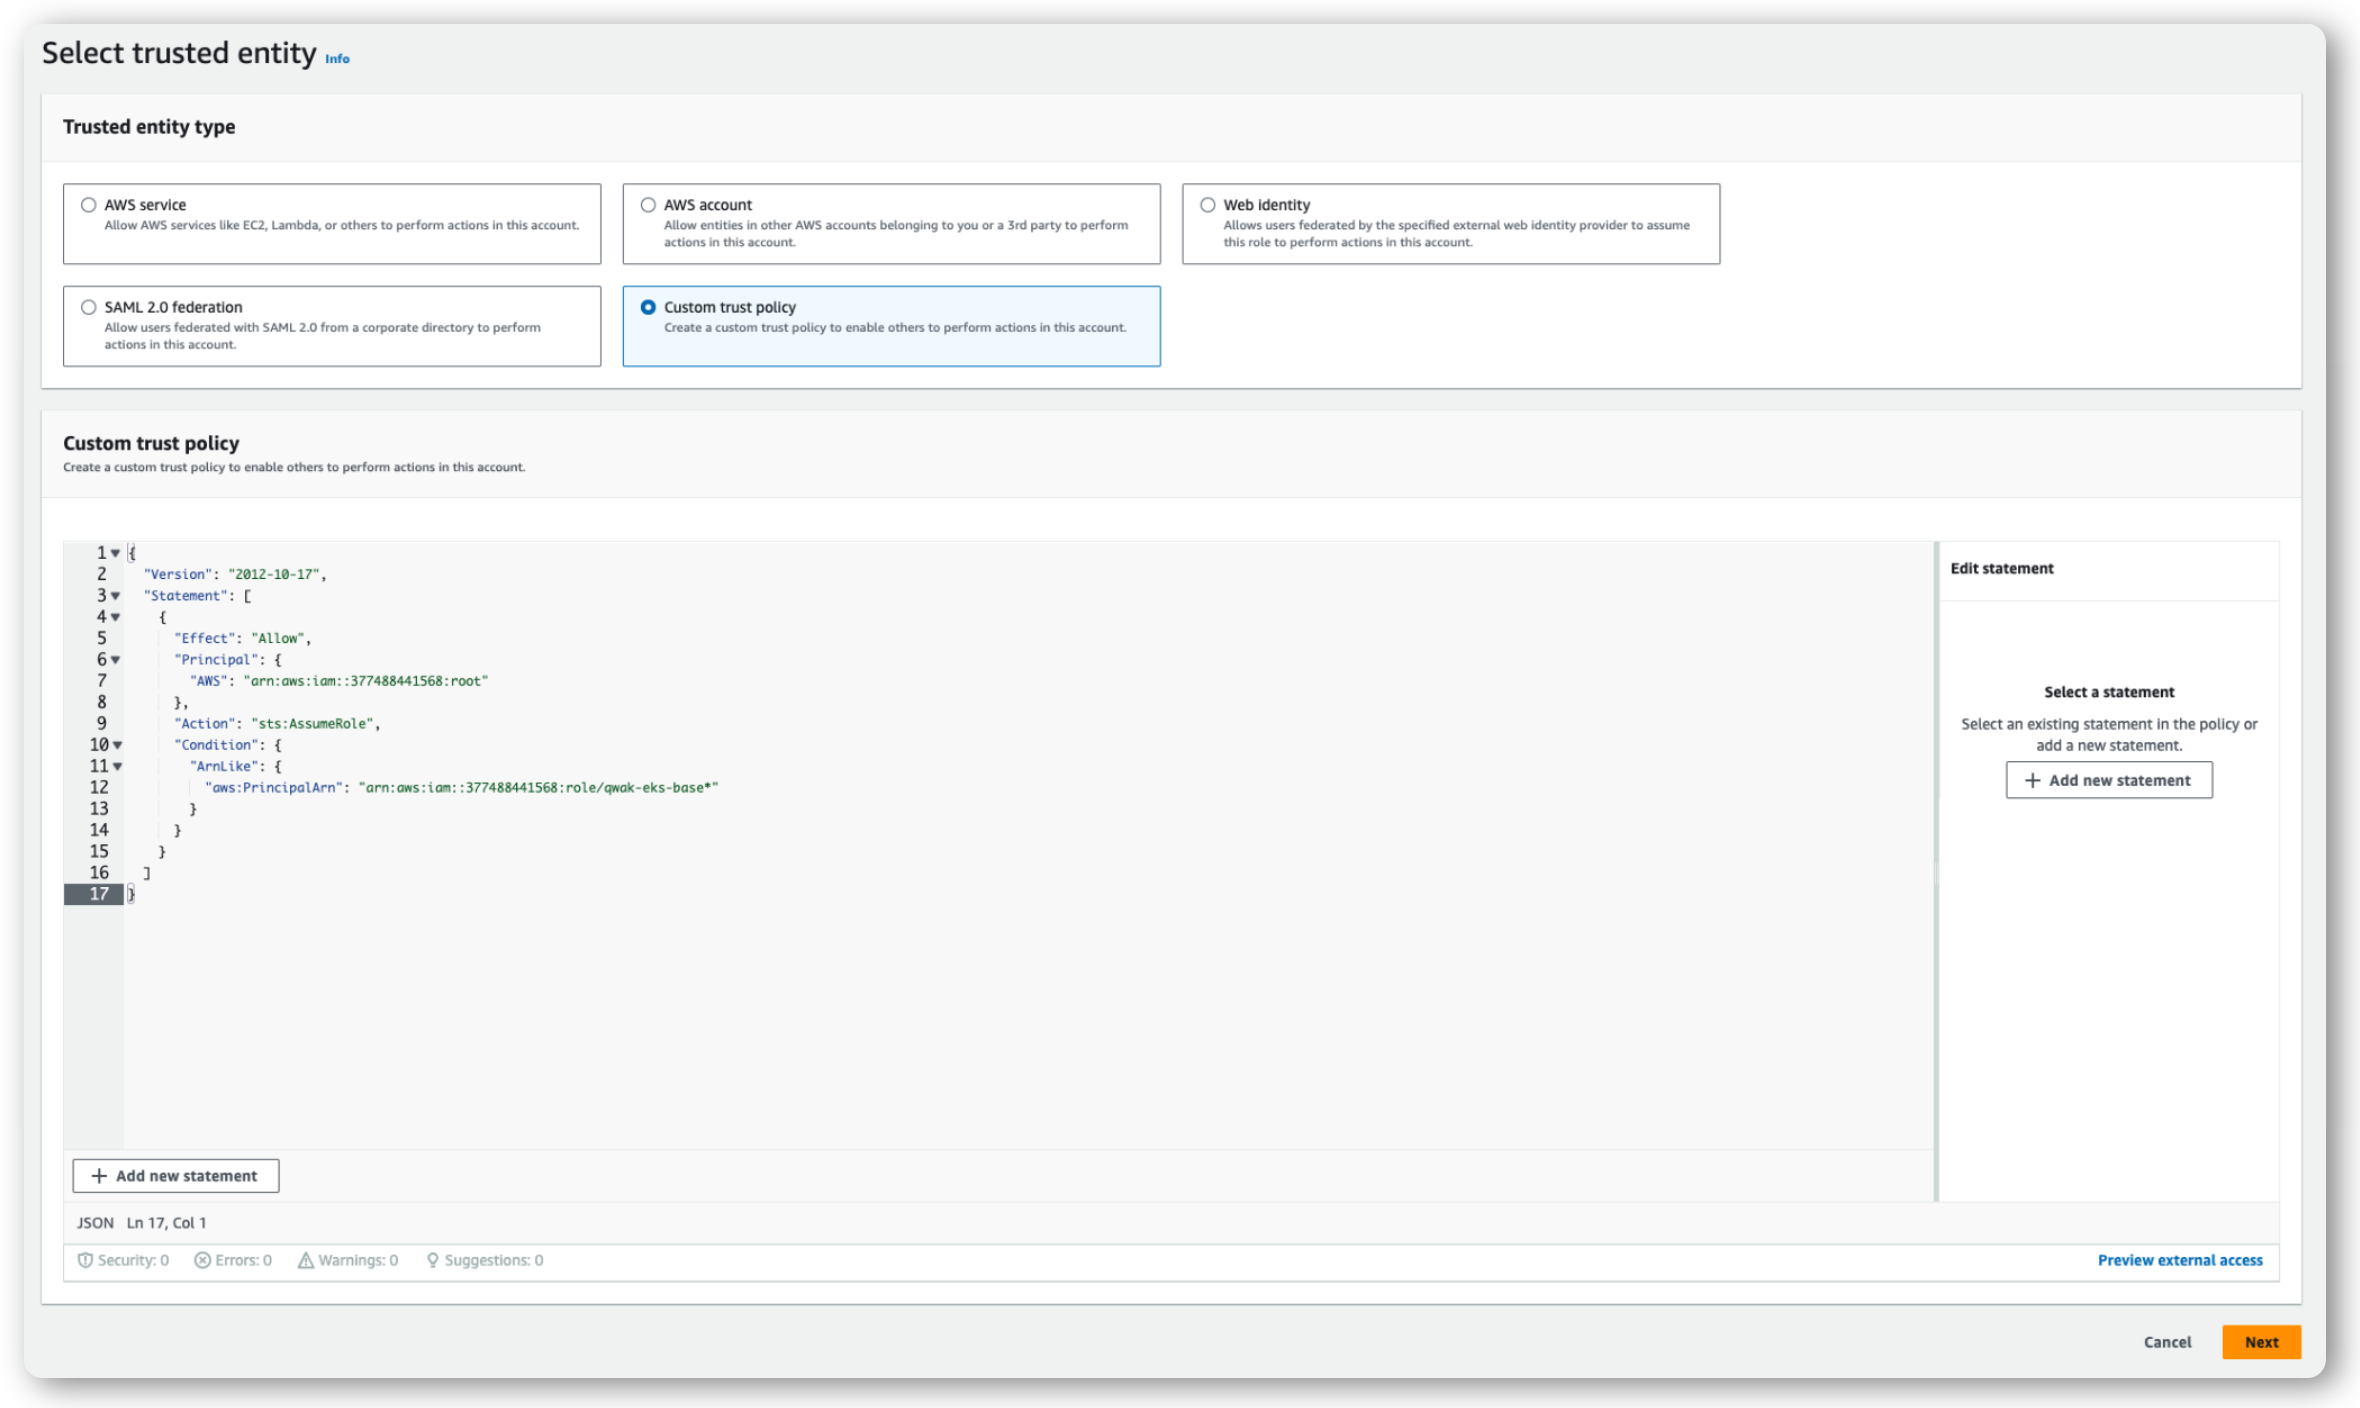
Select the Type to be Custom trust policy and paste the following policy:
{
  "Version": "2012-10-17",
  "Statement": [
    {
      "Effect": "Allow",
      "Principal": {
        "AWS": "arn:aws:iam::<account-id>:root"
      },
      "Action": "sts:AssumeRole",
      "Condition": {
        "ArnLike": {
          "aws:PrincipalArn": "arn:aws:iam::<account-id>:role/eksctl-Qwak-EKS-Cluster-nodegroup-*"
        }
      }
    },
    {
      "Effect": "Allow",
      "Principal": {
        "AWS": "arn:aws:iam::<account-id>:root"
      },
      "Action": "sts:AssumeRole",
      "Condition": {
        "ArnLike": {
          "aws:PrincipalArn": "arn:aws:iam::<account-id>:role/qwak-eks-base*"
        }
      }
    }
  ]
}
This policy allows the AWS account with ID <ACCOUNT-ID> to assume this role, but only if the calling Qwak Service ARN (Amazon Resource Name) matches the pattern arn:aws:iam::<ACCOUNT-ID>:role/qwak-eks-base*.
Account ID
If your Qwak deployment is running on Qwak Cloud, use
377488441568as the<ACCOUNT-ID>.
Your dashboard should look something like this:
Step 5. Add permissions
- Click "Add inline policy", then go to the JSON tab and paste your custom policy.
For example, to grant access to an S3 Bucket you can use the following JSON, just replace BUCKET_NAME with your specific bucket name:
{
  "Version": "2012-10-17",
  "Statement": [
    {
      "Effect": "Allow",
      "Action": [
        "s3:GetObject",
        "s3:ListBucket"
      ],
      "Resource": [
        "arn:aws:s3:::BUCKET_NAME",
        "arn:aws:s3:::BUCKET_NAME/*"
      ]
    }
  ]
}
- Click "Next".
- Fill in a name for the new policy and click "Create policy".
Essentially, this Permissions Policy allows this IAM role to read and list files from your bucket.
Step 6. Review and Create
- Fill in a name, for example
qwak-access-roleand a description for the new role. - Click Create role.
Using your IAM Role ARN in Qwak
Now that you created your IAM role you can use it to read data for CSV and Parquet Data Sources, access S3 files for Build Configurationsor Batch Executions just by referring the IAM Role ARN in the Qwak SDK or via the Qwak UI.

For more information on using IAM Role ARN please refer to the documentation page for your specific use case.
Updated 4 months ago