Batch Feature Set
What is a Feature Set?
A Feature Set is a fundamental component of a machine learning feature store. It is a structured and organized collection of features, also known as attributes or characteristics, that describe various aspects of data instances or entities in a consistent and standardized manner. Feature sets play a crucial role in enabling the development, training, and deployment of machine learning models.
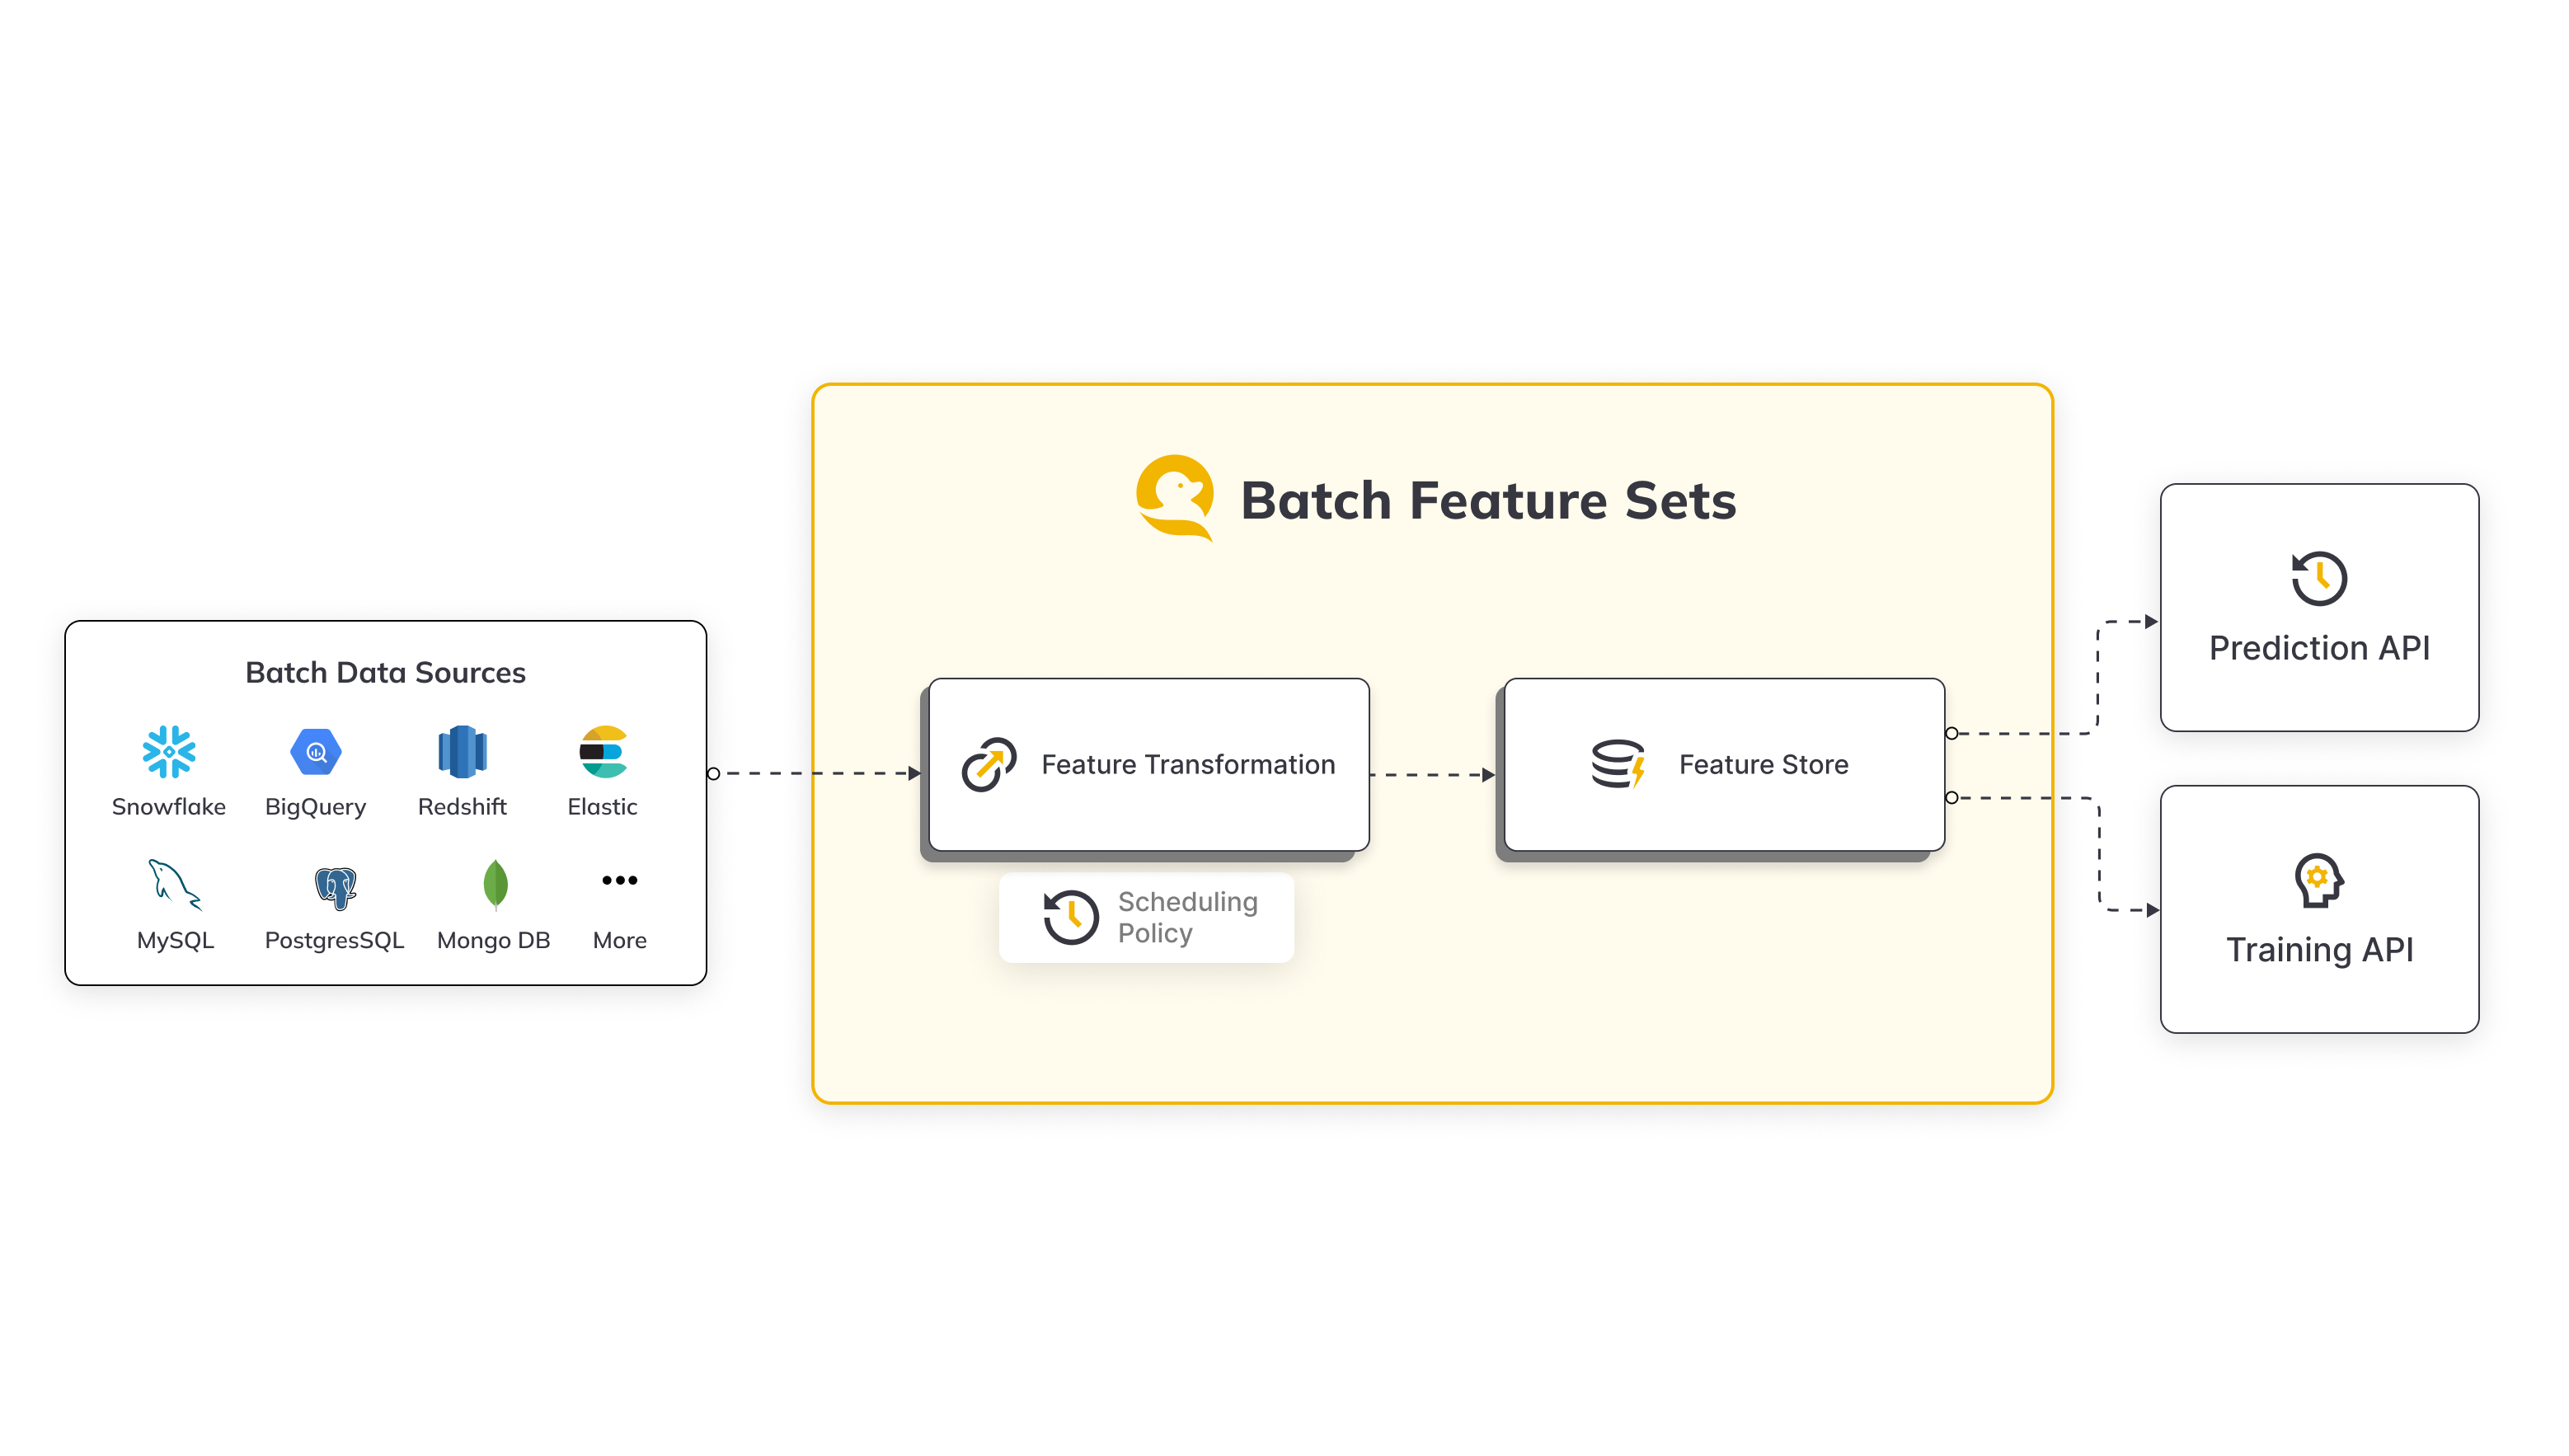
Batch Feature Set Overview
Batch Feature Sets in Qwak empower users to derive machine learning (ML) features efficiently by seamlessly extracting data from diverse batch sources such as Snowflake, BigQuery, S3, and more. This feature set methodology is designed to streamline the process of transforming raw data, provided by users, into structured features that can be utilized for various ML applications.
Workflow Overview
- Data Ingestion:
- Qwak supports batch data ingestion from a variety of sources, including Snowflake, BigQuery, S3, and others.
- Users can easily configure connections to these batch sources, ensuring a flexible and scalable data ingestion process.
- Batch Processing Engine:
- Serves as the computational hub where raw data is transformed into features. It's designed to handle large datasets that don't require real-time processing and prepares them for storage in the offline storage.
- The user-provided transformations can range from aggregations and filtering to complex data manipulations, offering users the flexibility needed to tailor features to their specific requirements.
- Offline and Online Stores:
- The resulting features are stored in Qwak's Feature Storage layer - the Offline and Online Stores.
- The Offline Store acts as your "data warehouse," a secure and organized place where feature data is stored after being processed by the batch or stream engines. It's designed to handle large volumes of data and is optimized for batch analytics.
- The Online Store is designed for low-latency access to feature data. It's optimized for quick reads and is the go-to place for real-time applications.
- Both layers serve as a unified hub for both online inference and the generation of training sets, facilitating seamless integration into ML workflows.
Common Use Cases
Batch Feature Sets in Qwak cater to a wide array of use cases, enabling users to derive valuable insights and enhance their machine learning models. Some common scenarios include:
- Compute Transaction Aggregates:
- Derive transaction aggregates from a Snowflake transaction table.
- Example: Calculate user expenditure over the last week, providing valuable insights into spending patterns.
- User Properties Ingestion:
- Ingest user properties from a BigQuery users table.
- Example: Incorporate user demographic information into ML models for personalized recommendations or targeted analysis.
These use cases represent just a glimpse of the versatility offered by Qwak's Batch Feature Sets, providing a robust framework for feature extraction and transformation in the realm of machine learning.
Batch Feature Set Creation
To create a batch feature set in Qwak, follow these steps, which involve defining a feature transformation function and utilizing the @batch.feature_set decorator along with the specified parameters:
- Feature Transformation Function:
- Begin by crafting a feature transformation function tailored to the desired processing of your raw data.
- Decorator Implementation:
- Apply the
@batch.feature_setdecorator to your transformation function, ensuring to include the following parameters:name: If not explicitly defined, the decorated function's name is used. The name field is restricted to alphanumeric and hyphen characters, with a maximum length of 40 characters.key: Specify the key for which to calculate the features in the feature set.data_sources: Provide a dictionary containing the names of relevant data sources that the feature set data will be ingested from.
- Apply the
- Ingestion Job Frequency:
- By default, ingestion jobs are triggered every 4 hours. However, users have the flexibility to explicitly define a different frequency based on their specific requirements.
These steps ensure the seamless creation of a batch feature set, allowing users to define the transformation logic and specify the essential parameters for efficient feature extraction and processing within the Qwak ecosystem.
Batch Feature Set Example
from qwak.feature_store.v1 import batch, SparkSqlTransformation

@batch.feature_set(
    name="user-features",
    key="user_id",
    data_sources=["snowflake_users_table"],
)
@batch.scheduling(cron_expression = "0 0 * * *")
def user_features():
    return SparkSqlTransformation(sql="""
        SELECT user_id,
               registration_country,
               registration_device,
               date_created
        FROM snowflake_users_table""")
This example:
- Creates a job that runs once a day, at midnight.
- Ingests data from the
snowflake_users_tablesource. - Creates a transformed feature vector with the fields:
user_id, registration_country, registration_device - Ingests the feature vector into the Qwak Feature Store
Adding Metadata
An optional decorator for defining feature set metadata information of:
owner - User name of feature set owner
description - Describe what does this feature set do
display_name - Alternative feature set name for UI display
from qwak.feature_store.v1 import batch, SparkSqlTransformation

@batch.feature_set(
    name="user-features",
    key="user_id",
    data_sources=["snowflake_users_table"],
)
@batch.metadata(
    owner="John Doe",
    display_name="User Aggregation Data",
    description="User origin country and devices"
)
def user_features():
    return SparkSqlTransformation(sql="""
        SELECT user_id,
               registration_country,
               registration_device,
               date_created
        FROM snowflake_users_table""")
Configuring Data Sources
When setting up the feature set data ingestion, carefully assign the Batch Data Sources to be utilized. Ensure that each data source name is explicitly mapped to its intended Read Policy.
By default, the read policy is set to New Only, indicating that the system reads only the records added since the last ingestion job. This approach optimizes efficiency by focusing on new data, enhancing the overall performance of the feature set.
import qwak.feature_store.feature_sets.read_policies as ReadPolicy
import qwak.feature_store.feature_sets.batch as batch
from  qwak.feature_store.feature_sets.transformations import SparkSqlTransformation

@batch.feature_set(
    name="user-features",
    key="user_id",
    data_sources = {
        "snowflake_users_table": ReadPolicy.NewOnly,
				"snowflake_countries_table": ReadPolicy.NewOnly,
    },
		timestamp_column_name="date_created"
)
def user_features():
    return SparkSqlTransformation(sql="""
			SELECT
			    users.user_id,
			    countries.registration_country_name,
			    users.registration_device,
			    users.date_created
			FROM
			    snowflake_users_table users
			    LEFT JOIN snowflake_countries_table countries
			    ON users.registration_country_code = countries.code
    """)
Timestamp Column
A timestamp column name represents the timestamp in which the feature vector event occurred, and it can either be set explicitly or it will be inferred automatically.
Notes
- When defining multiple data sources you must explicitly set the timestamp column.
- If the read policy is configured as Time Frame, an extra timestamp column named
QWAK_WINDOW_END_TSis introduced, serving as the designated timestamp column for the feature set.
Implicit timestamp definition
In the case of a single data source, the date_created_column specified in the data source settings is utilized for timestamp identification.
When using multiple data sources you must explicitly define the timestamp column
Managing the Scheduling Policy
To regulate the timing of ETL (Extract, Transform, Load) operations for batch features, scheduling policies play a pivotal role. Once a feature is deployed, the system calculates new feature values at intervals determined by the scheduling policy, which adheres to the crontab format.
Default scheduling policy
The default scheduling is every 4 hours if no policy is set.
from qwak.feature_store.v1 import batch, SparkSqlTransformation

@batch.feature_set(
    name="user-features",
    key="user_id",
    data_sources=["snowflake_users_table"],
)
@batch.scheduling(cron_expression = "0 0 * * *")
def user_features():
    return SparkSqlTransformation(sql="""
        SELECT user_id,
               registration_country,
               registration_device,
               date_created
        FROM snowflake_users_table""")
The definition above means that the feature ingestion job will be triggered on a daily basis, at midnight.
Creating Feature Sets for Manual Trigger Only
When None or “” is passed to the scheduling decorator during feature set creation, it results in the deployment of a feature set exclusively designed for manually initiation.
It's important to note that setting None will deactivate the automatic feature ingestion, requiring users to manually trigger the feature set when needed.
import qwak.feature_store.feature_sets.read_policies as ReadPolicy
import qwak.feature_store.feature_sets.batch as batch
from  qwak.feature_store.feature_sets.transformations import SparkSqlTransformation

@batch.feature_set(
    name="user-features"
    key="user_id",
    data_sources=["snowflake_users_table"],
    timestamp_column_name="date_created"
)
# Note: This feature set is manually triggered only
# Passing "" to a feature set disables automatic ingestion
@batch.scheduling(cron_expression="")
def user_features():
    return SparkSqlTransformation(sql="""
        SELECT user_id,
               registration_country,
               registration_device,
               date_created
        FROM snowflake_users_table
    """)
Populating Historical Feature Values through Backfilling
The backfill policy dictates the method, along with the specific date and time, for populating historical feature values in the newly created feature set.
import qwak.feature_store.feature_sets.read_policies as ReadPolicy
import qwak.feature_store.feature_sets.batch as batch
from  qwak.feature_store.feature_sets.transformations import SparkSqlTransformation

@batch.feature_set(
    name="user-features"
    key="user_id",
    data_sources=["snowflake_users_table"],
    timestamp_column_name="date_created"
)
@batch.backfill(start_date=datetime.datetime(year=1987, month=11, day=8))
def user_features():
    return SparkSqlTransformation(sql="""
        SELECT user_id,
               registration_country,
               registration_device,
               date_created
        FROM snowflake_users_table
    """)
Using SQL transformations
Qwak runs Spark SQL in the background. Please comply with Spark Standards.
The following is an implementation of creating a transformation using a SQL:
import qwak.feature_store.feature_sets.read_policies as ReadPolicy
import qwak.feature_store.feature_sets.batch as batch
from  qwak.feature_store.feature_sets.transformations import SparkSqlTransformation

@batch.feature_set(
    name="user-transaction-aggregations",
    key="user_id",
    data_sources={"snowflake_datasource": ReadPolicy.TimeFrame(days=30)},
)
def user_features():
    return SparkSqlTransformation(sql="""
            SELECT
            user_id,
            AVG(credit_amount) as avg_credit_amount,
            STD(credit_amount) as std_credit_amount,
            MAX(credit_amount) as max_credit_amount,
            MIN(date_created) as first_transaction,
            AVG(duration) as avg_loan_duration,
            AVG(job) as seniority_level
        FROM snowflake_datasource
        Group By user_id""")
Creating Transformations
When creating transformations, keep the following guidelines in mind:
- Key Inclusion:
- The resulting feature vector must incorporate the feature set key, used in the definition.
- Timestamp Column Requirement:
- For read policies such as
NewOnlyandFullRead, it is imperative to include the timestamp column in the returned feature vector.
- For read policies such as
- Use the data source as the table name in the FROM clause.
- Make sure the column names resulting from the SQL has no special characters. The allowed characters are: a-z,A-Z,0-9,_.
Logging
We support the default Python logger, which you can import from the standard python logging library.
Using PySpark transformations
To use this feature, ensure that you have installed the qwak-sdk with the feature-store extra.
pip install -U "qwak-sdk[feature-store]"
PySpark transformation is defined by creating a UDF which is responsible for the transformation logic.
UDF definition:
- Arguments:
df_dict: spark.DataFrame- Mandatory
A dictionary in the form of{'\<batch_sourcename>': df ...}.qwargs: Dict[str, Any]- Optional
If added, runtime parameters will be injected viaqwargs(e.g.qwak_ingestion_start_timestamp,qwak_ingestion_end_timestamp)
- Return value: spark.DataFrame
The returned df (PySpark DataFrame) must contain a column representing the configured entity. The df column names must not include whitespaces or special characters.
Python and Dependency Restrictions
To ensure compatibility and stability, it is mandatory to use Python 3.8 when registering a feature set with a Koalas transformation. Additionally, ensure that
cloudpickleversion is locked to2.2.1.
from typing import Dict, Any

import pyspark.sql as spark
import pyspark.sql.functions as F

from qwak.feature_store.feature_sets import batch
from qwak.feature_store.feature_sets.read_policies import ReadPolicy
from qwak.feature_store.feature_sets.transformations import PySparkTransformation

@batch.feature_set(
    name="user-features",
    entity="user",
    data_sources={"snowflake_transactions_table": ReadPolicy.TimeFrame(days=30)},
    timestamp_column_name="date_created"
)
@batch.scheduling(cron_expression="0 8 * * *")
def transform():
  def amount_stats(df_dict: Dict[str, spark.DataFrame], qwargs: Dict[str, Any]) -> spark.DataFrame:
    df = df_dict['snowflake_transactions_table']
    agg_df = df.groupby('user').agg(F.max('amount').alias("max_duration"))

    return agg_df

  return PySparkTransformation(function=amount_stats)
Function scope and dependencies
PySpark function scope and variables must be defined under the transform function, as shown in the code snippet above.
At runtime, only PySpark and python native library, are available.
Logging
We support the default Python logger, which you can import from the standard python logging library.
Using Koalas transformations (Hybrid ONLY)
Koalas is a pandas implementation using Spark. Ensure your code complies with Databricks Koalas library.
The UDF receives as input a dictionary in the form of {'\<batch_sourcename>': kdf ...}.
The returned kdf (Koalas DataFrame) must contain a column representing the configured entity. The kdf must not include complex columns, such as multi index, and the name must not include whitespaces or special characters.
Make sure that column names returned from the UDF has no special characters.
The allowed characters are: a-z,A-Z,0-9,_.
Python and Dependency Restrictions
To ensure compatibility and stability, it is mandatory to use Python 3.8 when registering a feature set with a Koalas transformation. Additionally, ensure that
cloudpickleversion is locked to2.2.1.
import qwak.feature_store.feature_sets.batch as batch
from qwak.feature_store.feature_sets.read_policies import ReadPolicy
from qwak.feature_store.feature_sets.transformations import KoalasTransformation

@batch.feature_set(
    name="user-features",
    key="user",
    data_sources={"snowflake_transactions_table": ReadPolicy.TimeFrame(days=30)},
    timestamp_column_name="date_created"
)
@batch.scheduling(cron_expression="0 8 * * *")
def transform():

  def amount_stats(kdf_dict):
    kdf = kdf_dict['snowflake_transactions_table']
    agg_kdf = kdf.groupby('user').agg({'amount': ['avg', 'sum']})
    agg_kdf.columns = ['_'.join(column) for column in kdf.columns.values]
    return agg_kdf

  return KoalasTransformation(function=amount_stats)
Function scope and dependencies
Koalas function scope and variables must be defined under the transform function, as shown in the code snippet above.
At runtime, only pandas and koalas and python native library, are available.
Logging
We support the default Python logger, which you can import from the standard python logging library.
Supported Spark column types
IntegerType, LongType, StringType, DoubleType, DecimalType, FloatType, BooleanType, TimestampType, DateType, ArrayType.
ArrayType column may include any of the above column types, except for another ArrayType column.
Batch cannot insert rows with an older timestamp than the current oldest timestamp in the offline feature store.
Each batch must produce a timestamp equal to or larger than the last batch.
Specifying Execution Resources
In Qwak, the allocation of resources crucial for batch execution jobs, often termed as the "cluster template," is vital. This template encompasses resources like CPU, memory, and temporary storage, essential for executing user-defined transformations and facilitating feature ingestion into designated stores.
The default size for the cluster template initiates at MEDIUM if none is explicitly specified.
from qwak.feature_store.feature_sets.execution_spec import ClusterTemplate
from qwak.feature_store.v1 import batch, SparkSqlTransformation

@batch.feature_set(
    name="user-features",
    key="user_id",
    data_sources=["snowflake_users_table"])
@batch.execution_specification(cluster_template=ClusterTemplate.LARGE)
def user_features():
    return SparkSqlTransformation(sql="""
        SELECT user_id,
               registration_country,
               registration_device,
               date_created
        FROM snowflake_users_table""")
Getting Feature Samples
To make sure the generated feature set matches your expectation, even before the feature set is registered in Qwak, use the get_sample functionality.
This function computes a sample feature vectors using the defined transformation applied on a sample data from your defined data source and returns a pandas DataFrame.
    @batch.feature_set(
        name="user-transaction-aggregations",
        key="user_id",
        data_sources={"snowflake_datasource": ReadPolicy.NewOnly()},
        timestamp_column_name="DATE_CREATED"
    )
    def user_features():
        return SparkSqlTransformation(sql="""
                SELECT
                user_id,
                date_created,
                AVG(credit_amount) as avg_credit_amount,
                MAX(credit_amount) as max_credit_amount,
                MIN(date_created) as first_transaction
            FROM snowflake_datasource
            Group By user_id, date_created""")

user_features_df = user_features.get_sample(number_of_rows=10)
The following is an example of user_features_df Dataframe result:
+----+--------------------------------------+----------------+---------------------+---------------------+---------------------+
|    | user_id                              |   date_created |   avg_credit_amount |   max_credit_amount |   first_transaction |
|----+--------------------------------------+----------------+---------------------+---------------------+---------------------|
|  0 | baf1aed9-b16a-46f1-803b-e2b08c8b47de |  1609459200000 |                1169 |                1169 |       1609459200000 |
|  1 | 1b044db3-3bd1-4b71-a4e9-336210d6503f |  1609459200000 |                2096 |                2096 |       1609459200000 |
|  2 | ac8ec869-1a05-4df9-9805-7866ca42b31c |  1609459200000 |                7882 |                7882 |       1609459200000 |
|  3 | aa974eeb-ed0e-450b-90d0-4fe4592081c1 |  1609459200000 |                4870 |                4870 |       1609459200000 |
|  4 | 7b3d019c-82a7-42d9-beb8-2c57a246ff16 |  1609459200000 |                9055 |                9055 |       1609459200000 |
|  5 | 6bc1fd70-897e-49f4-ae25-960d490cb74e |  1609459200000 |                2835 |                2835 |       1609459200000 |
|  6 | 193158eb-5552-4ce5-92a4-2a966895bec5 |  1609459200000 |                6948 |                6948 |       1609459200000 |
|  7 | 759b5b46-dbe9-40ef-a315-107ddddc64b5 |  1609459200000 |                3059 |                3059 |       1609459200000 |
|  8 | e703c351-41a8-43ea-9615-8605da7ee718 |  1609459200000 |                5234 |                5234 |       1609459200000 |
|  9 | 66025b0f-6a7f-4f86-9666-6622be82d870 |  1609459200000 |                1295 |                1295 |       1609459200000 |
+----+--------------------------------------+----------------+---------------------+---------------------+---------------------+
Registering a Feature Set
The ETL pipeline will begin after registering a batch feature set.
There are two options for registering new features:
- Pointing directly to a Python file or directory containing the feature set definitions, for example
qwak features register -p ./user_project/features/feature_set.py
- Letting qwak cli recursively search through all python files in the current directory, and all directories below. We will search through all .py files and look for feature set definitinos.
qwak features register
Function naming conventions
Same feature set transformation function name, cannot be defined more than once per .py file
✅ Recursively looking for python files in input dir (0:00:00.61)
✅ Finding Data Sources to register (0:00:00.01)
👀 Found 2 Data Sources
----------------------------------------
✅ Finding Feature Sets to register (0:00:00.00)
👀 Found 9 Feature Set(s)
The pipeline execution status will be visible in the UI under the list of registered feature sets.
To view the status in the UI, go to Feature Store -> Feature Sets -> Batch Feature Set Name.
Updating a Feature Set
Feature set configuration may be updated, except for the following limitations
Recreating feature sets
Changing any of the parameters above requires deleting and recreating a feature set:
- Backfill Start Date
- Read Policy
- Scheduling Policy
Deleting a Feature Set
Feature sets may be deleted using a Qwak CLI command.
To delete a feature set, simply refer to it by it's name.
There's no need to be located in a certain folder in the project structure.
For example, in the above examples we created a feature set named user-features. To delete this feature set via the Qwak CLI, all I need is the following command.
qwak features delete user-features
Manually Executing an Ingestion Job
In case you would like to execute an ingestion job immediately, the following options are supported:
- Python SDK - using the
QwakClient:
from qwak import QwakClient

client = QwakClient()
client.trigger_batch_feature_set("user-features")
- CLI - using the following command:
qwak features run user-features
- Qwak web UI - via the 'Jobs' tab in the app, click on 'Execute Job'.
Pausing/Resuming Batch Ingestion Jobs
When pausing a Batch Feature Set, future ingestion jobs will not be scheduled (running jobs are not affected), yet you can still manually trigger ingestion jobs.
Upon resuming a batch feature set, it is re-scheduled, and ingestion jobs will continue ingesting data from where they have last left off.
When resuming a feature set, the ingestion jobs will continue as scheduled - meaning feature sets jobs will start "catching up" on jobs that were skipped during the time it was paused.
For example, if an hourly feature set we paused for 3 days - after resuming it, those hourly jobs will be executed immediately one after the other until the data is all caught up.
To pause a Batch Feature Set, use the Qwak CLI:
qwak features pause user-features
Accordingly, to resume:
qwak features resume user-features
Updated 18 days ago